
Regular readers know I love to photograph Black-billed Magpies. They appeal to me because they’re diabolically smart, they’re bursting with personality and they have interesting behaviors. Throw in the difficulties of exposing a black and white bird properly, the compositional problems caused by that ridiculously long tail and the challenges of getting their iridescence to show up in photographs and you have a photo subject that isn’t easy but still has the potential to yield some very interesting images.
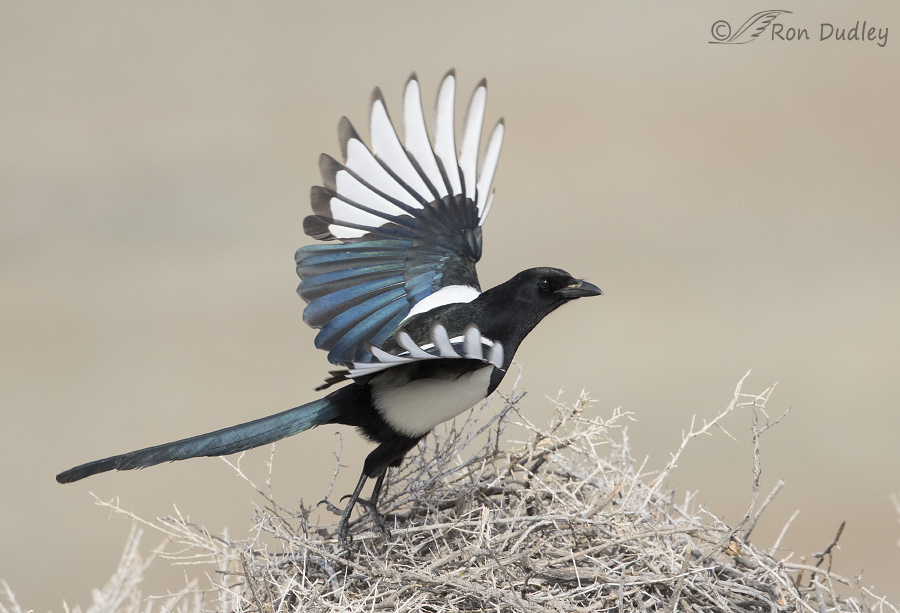
 1/2500, f/6.3, ISO 800, Canon 7D Mark II, Canon EF 500mm f/4L IS II USM + 1.4 tc, not baited, set up or called in
I photographed this one four days ago on Antelope Island as it lifted off from an old nest that it’s refurbishing for potential use this year. I’m happy with the image because I like the iridescence, the head turn slightly toward me, the nice look at the extended left wing and the fact that I didn’t clip any body parts as it took off. I’ll admit that after a long winter I’m beginning to tire of these background colors but the island is now beginning to green up nicely so that should improve in future images.
As I was working this image up I noticed a processing challenge that often rears its ugly head with dark subjects against lighter backgrounds so with the knowledge that many of my readers are novice or intermediate photographers I decided to address that issue this morning. If you’re not into photo-geekiness you’ll likely be bored to tears and may wish to go pour yourself another cup of coffee instead of scrolling further.
And I wouldn’t blame you if you did.
This is the same image as the first one and both were processed identically with one exception. Before I point it out, do you see the problem with this image?
This version has a narrow sharpening halo between the darks of the bird and the lighter background. It appears as a bright narrow border that is most easily seen around the blacks of the head and neck where they meet the tan background. Halos can be difficult for some to notice but for many of us they stand out like a sore thumb and are a glaring sign of amateurism and laziness in processing (sorry if that’s a little harsh but IMO it’s true…).
The only difference between the two versions of the image is that the second was sharpened globally (the entire image was sharpened) and in the first only the bird was sharpened (by masking the bird first).
Sharpening halos can usually be avoided by sharpening the bird selectively instead of sharpening the entire image globally. But the process of masking the bird before sharpening can be time-consuming so it’s easier and quicker to sharpen globally and hope no one notices the halo. I nearly always notice…
And since sharpening also increases noise, selective sharpening prevents that increase in the unsharpened background.
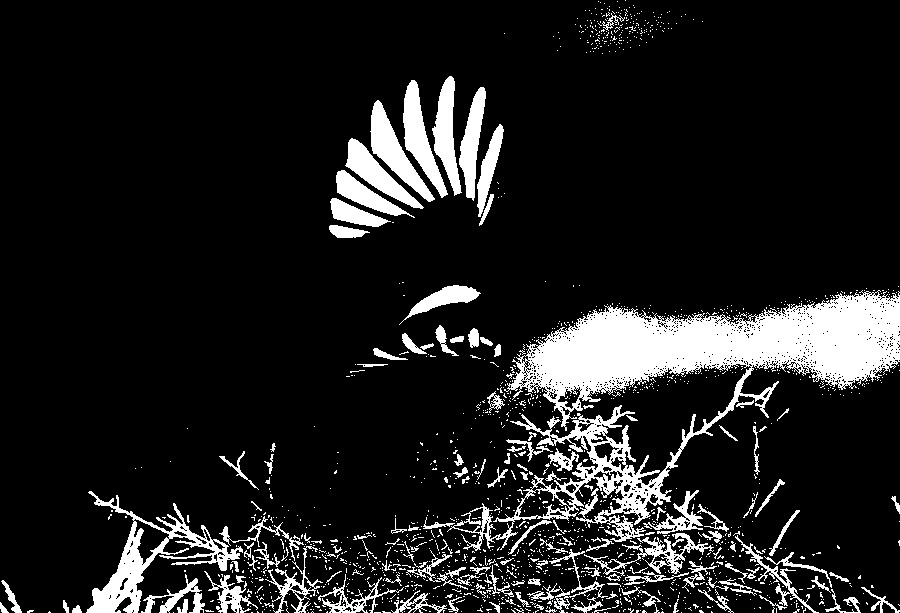
For some, halos can be difficult to spot so if you use Adobe Photoshop (or Elements) for processing there’s a little trick you can use to make it much more apparent (so that it can be corrected if it exists) – in Photoshop it’s called a Threshold Layer (layer, new adjustment layer, threshold, then move the slider). This is a Threshold Layer of the image (slider moved to 191) and because the bird has been sharpened selectively there is no halo to speak of.

This is a Threshold Layer of the same photo (slider also moved to 191) where the entire image was sharpened globally and doing so caused a distinct halo that can be seen as a narrow white line of “marching ants” around the perimeter of the bird where the blacks meet the background. Sometimes the halo is much wider than this and fades gradually between the bird and the background.
I’ll admit that sometimes I get lazy too and sharpen globally but when I do I nearly always run a Threshold Layer on the image just to double-check for a halo that I hadn’t noticed. For me it’s embarrassing to go back to an old post that’s out there for the entire world to see and there’s a halo around the bird that I missed during processing.
If you’re not a serious photographer (and have no intentions of becoming one) and you’ve plodded through this entire post anyway I applaud you for your flexibility in interests. And your tenacity…
Ron
Note: Another camping/photo trip begins this morning – hopefully I’ll have better luck with birds than I did earlier this month. I’ll post from the road if I can…
Ron: A 15-year bird photographer, I just simply (with prejudice) dislike halos. I have an old piece of software (by Fred Miranda) that lets me sharpen with no halo at all. Perhaps there is an easy way to do that in newer versions of Photoshop? I run CS5 for the sharpening, CS6 for the rest, because the Fred Miranda software is incompatible with CS6 (and 64-bits by the way).
Meanwhile, back at the ranch, your magpie shot is truly beautiful. Thanks!
Add me to the magpie lovers. Of course.
As a happy snapper rather than a photographer this was beyond my capabilities. Like Laura, not a superpower I posses. Just the same, information is alwaya a gift.
Have a wonderful trip away.
Hi Ron
As I said to Zaphir I can´t see the difference between the two images but nevertheless I thank you for the lesson because usually I don’t work with layers on PS. Next time I’ll give it a try.
Have a safe journey.
Oh and here’s to a fun and productive trip! Travel carefully and have a GREAT time!
Yet another ridiculously redundant OH WOW! I love corvids, especially magpies, well, and ravens, crows, blue and Steller’s jays and oh yeah, scrub jays and the rest of them.
Yes I read the entire thing, but it was Greek to me, so I just went back up and enjoyed the two photos, leaving the technical issues to others. Photography is just NOT my super power and that’s OK. I can live with that and just enjoy the pretty pictures you and others who fuss over these details take. And since admittedly I’m easily amused, life is good!
Hi Ron, Thank you so very much. Visually your post cant’t be beat. To add intellectual information about photography makes your blog the best.
Ron: I looked and looked, but couldn’t tell the difference between the 2 pictures. Even bumped it up to 300% and still couldn’t tell the difference. That said, I want to process photos better and had never heard of threshold layering…so thank you!! This wasn’t too technical or geeky…it contained enough information in manner that flowed and could be followed. I am very grateful that you took the time to dedicate a blog entry to sharpening photographs. I hope this trend continues when the time and situation presents. I mean, we all want to shoot like you do…finding out some of your processes in post is an important aspect. Thank You Ron Dudley!!
It happened to me too Zaphir. I can’t see the difference between the two photos.
I know I spent the entire day inside a dark room doing X-rays and probably my eyes are a bit tired. But it can’t be the reason.
Hope our “teacher” solves the mystery.
Thanks for the information. I too read it all the way through!!!
Carol
Good for you, Carol! I know it’s a bit of a chore to do so.
I don’t know diddly about photo processing but I loved the “marching ants” description.
: )
I love that phrase too, Mark – it’s perfectly descriptive.
I get an A+ for tenacity, practically scrolled my poor old fingers off….and couldn’t find a single problem with either image…even checked the calendar to be sure it wasn’t the first of April…I give up!!! All I see, im both images, is a beautifull picture of a very elegant bird with wonderful iridescence….makes me think of the story of the emperor’s new clothes……
Patty, then processing images for your own use would be easy since you don’t have to worry about masking or seeing halos!
Halos and I don’t mix apparently….no surprise there! Horns are another matter….
I learn something from most of your blogs. I work with PS a lot, but mostly to create posters and such. I’m still a neophyte where it comes to post processing of images. I’d seen the threshold option before, but I had no idea what it did. Thanks for the explanation. Now I need to go digging and find out what else one uses it for.
“Now I need to go digging and find out what else one uses it for.”
I’m in the dark about that one, Catherine…
Thanks, Ron!! I will now go to some of my old images and work on sharpening.
Good luck, Jane.
Thanks so much, Ron! I, too, have been bothered by halos rimming edges in my photos , and I’m grateful to know how to avoid them. Please do keep sharing these technical details for us ‘geeks’!
Thank you, Alison. Let me know how it goes with getting rid of those halos.
I’ve just started sharpening in photoshop elements – I havent noticed halo’s….I think I will take a re-look at my images. Thanks for the help! And Ive just discovered your blog, and am loving the images! I also now, am really wanting to upgrade my 400mm f5/6 to the 500mm…..but the $$!!
I know what you mean about the financial commitment for the 500mm, Melissa. But it sure is a wonderful lens!
Thank you Ron. This was a very interesting and helpful read. I had not known about using a threshold layer and always had trouble seeing halos from sharpening. I did not notice the difference at first between the first and second images w.r.t. to halos. I rarely apply sharpening, however, I realize that Lightroom does apply some default sharpening to the RAW files when I import them (sharpening = 25, radius = 1.0, detail =25).
Yesterday while hiking I was wondering about this and how this approach of mine, of just letting each image take the default sharpening LR applies is not a good idea (and lazy). So your article is timely and I need to go get some help on why I am thinking about sharpening while hiking 😉
If I do sharpen, I do use a mask and like that option. I do apply noise reduction on dark and and high ISO images, however I use the Nik DFine 2 plugin for that, it allows control points for selective noise reduction in parts of the image. I like it better than doing the same thing with layers and masks in Photoshop.
Have a fun and productive trip Ron. I look forward to seeing your images when you get back.
Thank you, Ed. I first learned about the value of threshold layers long ago from my friend Richard Ditch on the image critique forum Nature Photographer’s Network (NPN). It’s a lesson that has served me well over the years.
Thanks Ron for this post. Great info for me as I have had that very issue when processing my images.
It’s a very common problem, Gary – one too many folks let slide because they don’t know how to prevent it. It’s my hope that this info is useful to folks who want to avoid halos in their images.
Ron… this is the type of information that I really appreciate… thanks… ;-)))
Good!!! Thank you for that feedback, Roger.
Interesting – the 1st image looked a tad sharper but I sure couldn’t tell what the issue was! 🙂 Thx for the tutorial!
Judy, perhaps the first image looked sharper to you because the narrow halo somehow interfered with the apparent crispness of the edges. The same amount of sharpening was applied to both birds. I’m glad you appreciated the geekiness…